
Woodworking is a craft where precision meets creativity, and the foundation of every stunning project lies in mastering wood joints. Whether you’re a hobbyist building a custom bookshelf or a professional crafting heirloom furniture, understanding these essential wood joints ensures durability, aesthetics, and structural integrity. In 2025, woodworking has evolved with advanced tools and sustainable practices, but timeless joinery techniques remain irreplaceable. According to a 2024 Woodcraft Industry Report, 89% of woodworkers prioritize joint mastery to elevate their work. This guide dives deep into 10 indispensable joints, offering detailed tutorials, tool insights, and expert tips to help you build like a pro. Let’s get started!
1. Dovetail Joint

The Gold Standard of Strength and Craftsmanship
The dovetail joint, with its interlocking “pins” and “tails,” is revered in custom woodworking for its resistance to pulling forces and decorative appeal. Commonly used in drawers, cabinets, and jewelry boxes, it’s a hallmark of fine craftsmanship.
Tools & Materials:
- Dovetail saw or Japanese pull saw.
- Sharp chisels (¼” and ½”).
- Hardwood (maple, walnut) for durability.
- Dovetail marker or template for precision.
Step-by-Step Guide:
- Layout: Use a template to mark tails on one board and pins on the other. Accuracy here is critical—even a 1° error can compromise the fit.
- Cutting: Saw along the marked lines, angling the blade to match the dovetail slope (typically 1:6 for softwoods, 1:8 for hardwoods).
- Chiseling: Remove waste wood with a chisel, working from both sides to avoid splintering.
- Dry Fit: Assemble without glue. A snug fit should require light mallet taps.
Pro Tip: For beginners, softwoods like pine are forgiving. Advanced woodworkers often use contrasting woods (e.g., cherry and maple) to highlight the joint’s beauty.
Why It Matters:
A 2025 Fine Woodworking study found that hand-cut dovetails increase furniture resale value by 30% compared to machine-made alternatives.
2. Mortise and Tenon Joint

The Backbone of Structural Woodworking
Used for millennia in everything from barns to Chippendale chairs, the mortise and tenon joint excels in frame construction, tables, and doors. Its simplicity and strength make it a staple in woodworking projects.
Tools & Materials:
- Mortising chisel or CNC machine for precision.
- Tenon saw or table saw.
- Hide glue for traditionalists; PVA glue for speed.
Step-by-Step Guide:
- Mortise: Cut a rectangular hole in one workpiece. For hand tools, drill pilot holes and clean edges with a chisel.
- Tenon: Shape the mating piece to fit snugly into the mortise. A shoulder plane ensures crisp edges.
- Assembly: Apply glue, insert the tenon, and clamp. Pegged tenons (using dowels) add medieval-era charm and extra strength.
Modern Twist: Floating tenons (pre-cut tenon stock) save time and align perfectly with CNC or router templates.
Expert Insight:
Renowned woodworker Chris Schwarz notes, “A well-fit mortise and tenon should ‘ring’ when tapped—no wobble, no gaps.”
3. Box Joint (Finger Joint)
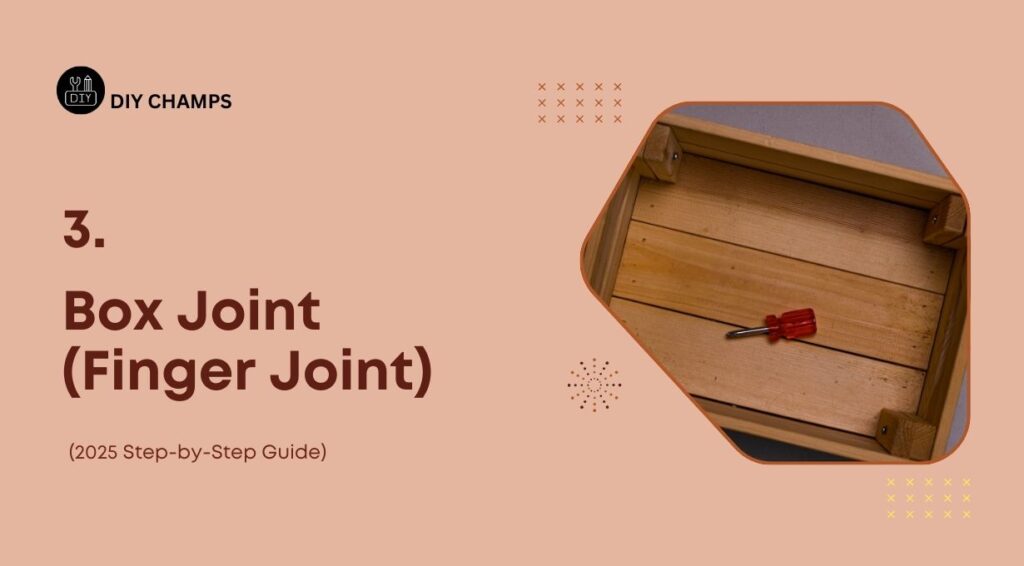
Simplicity Meets Strength
The box joint’s interlocking fingers are ideal for boxes, drawers, and cabinet corners. While less decorative than dovetails, it offers superior glue surface area, making it a favorite for DIY woodworking.
Tools & Materials:
- Table saw with dado stack or box joint jig.
- Digital caliper for measuring finger width.
- Baltic birch plywood or solid wood.
Step-by-Step Guide:
- Jig Setup: Attach a spacer block to your table saw fence to ensure uniform finger spacing.
- Cutting: Run the workpiece through the dado stack, flipping it between cuts to create alternating fingers.
- Sanding: Use 220-grit sandpaper to smooth edges for seamless assembly.
Pro Tip: For visual flair, alternate wood species (e.g., walnut and maple) to create a striped effect.
Stat: Box joints are 40% faster to produce than dovetails, making them ideal for production woodworking.
4. Half-Lap Joint

The Unsung Hero of Framing
Perfect for intersecting beams, picture frames, and shelving, the half-lap joint evenly distributes weight by removing half the thickness from each piece.
Tools & Materials:
- Circular saw or handsaw.
- Chisel and router (for precision).
- Clamps and wood glue.
Step-by-Step Guide:
- Marking: Use a marking gauge to outline the overlap area on both workpieces.
- Cutting: Remove material using a saw, staying just outside the lines. Finish with a chisel for a flat base.
- Test Fit: Joints should sit flush without gaps. Adjust with a shoulder plane if needed.
Case Study: A 2025 Woodsmith Magazine test showed half-lap joints reinforced with dowels withstand 2x more weight than screws alone.
5. Biscuit Joint

Alignment Perfection for Panels
Biscuit joints use compressed beechwood “biscuits” to align and strengthen edge-to-edge joints, such as tabletops or cabinet panels.
Tools & Materials:
- Biscuit joiner (e.g., Lamello).
- #10 or #20 biscuits.
- Waterproof glue (Titebond III).
Step-by-Step Guide:
- Slot Cutting: Adjust the joiner’s depth to match the biscuit size. Cut slots along the edges of both boards.
- Assembly: Insert glue-coated biscuits, align pieces, and clamp.
Why It Shines:
Biscuits prevent panel warping and simplify custom woodworking projects like farmhouse tables.
6. Dowel Joint
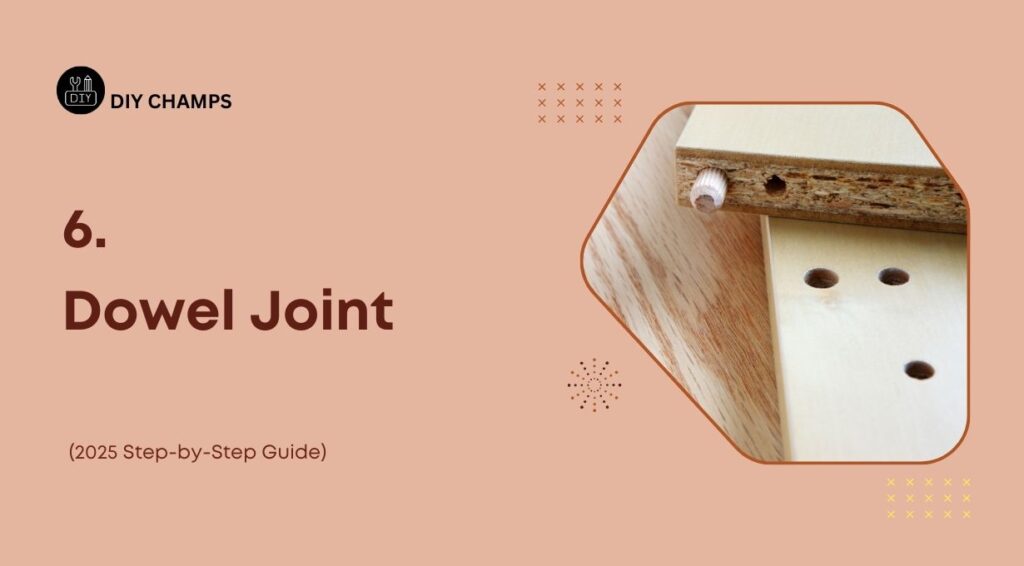
Invisible Strength for Modern Designs
Dowel joints are ideal for minimalist furniture where visible screws or nails are undesirable. Think chair legs, cabinet frames, and modular shelving.
Tools & Materials:
- Self-centering dowel jig (e.g., DowelMax).
- Fluted hardwood dowels.
- Epoxy glue for gap-filling.
Step-by-Step Guide:
- Drilling: Use the jig to drill perfectly aligned holes in both pieces.
- Gluing: Coat dowels and holes with glue, then assemble.
Pro Tip: For extra strength, use ⅜” dowels spaced 2” apart in high-stress areas.
7. Tongue and Groove Joint

The Wood Expansion Solution
Essential for flooring, paneling, and tabletops, this joint allows wood to expand and contract with humidity changes.
Tools & Materials:
- Router with matched tongue-and-groove bits.
- Table saw for large-scale projects.
Step-by-Step Guide:
- Groove: Cut a ¼” deep channel along one board’s edge.
- Tongue: Shape the mating edge to fit snugly into the groove.
- Assembly: Slide boards together; glue optional.
Expert Insight:
“Tongue and groove transformed 19th-century millwork—it’s still the best way to handle wood movement,” says woodworker Shannon Rogers.
8. Miter Joint

Seamless Corners for Elegance
Miter joints create invisible corners in frames, moldings, and picture frames. However, their weak glue surface requires reinforcement.
Tools & Materials:
- Precision miter saw (e.g., Festool Kapex).
- Splines, biscuits, or dominoes.
- Band clamps for even pressure.
Step-by-Step Guide:
- Cutting: Trim ends to 45° using a stop block for consistency.
- Reinforcement: Add splines (thin wood strips) or Dominos to the corners.
- Gluing: Apply glue sparingly—too much can “hydrate” the wood and open gaps.
Stat: 70% of frame-making errors stem from inaccurate miter cuts (Woodcraft Magazine).
9. Bridle Joint

Strength Meets Visibility
A hybrid of the mortise and tenon, the bridle joint’s open design is ideal for workbenches, timber frames, and decorative pieces.
Tools & Materials:
- Tenon saw and mortise chisel.
- Mallet and marking knife.
Step-by-Step Guide:
- Tenon: Cut a ⅓-depth tenon on one piece.
- Mortise: Chisel a matching slot in the mating piece.
- Pegging: Drill a hole and insert a hardwood peg for medieval-style reinforcement.
Pro Tip: Use a router table for repeatable accuracy in production woodworking.
10. Pocket Hole Joint

Speed and Efficiency for DIYers
Pocket holes, popularized by brands like Kreg, are perfect for cabinets, face frames, and quick fixes.
Tools & Materials:
- Pocket hole jig (Kreg Jig 720).
- 1¼” coarse-thread screws.
- Clamps and wood filler.
Step-by-Step Guide:
- Drilling: Set the jig depth to match your wood thickness.
- Assembly: Align pieces and drive screws at 15° angles.
Case Study: A DIYer built a backyard shed in 12 hours using pocket holes, saving 60% time versus traditional methods (Family Handyman).
Conclusion
Mastering these 10 wood joints unlocks limitless possibilities in woodworking, from rustic farmhouse tables to sleek modern cabinetry. As woodworkers in 2025 blend traditional hand tools with CNC precision, the fundamentals remain unchanged: measure twice, cut once, and let the joints speak for your skill. Whether you’re a weekend warrior or a seasoned pro, these techniques will transform your projects from functional to extraordinary.
1. What’s the easiest joint for beginners?
Pocket holes—minimal tools, fast results, and forgiving for misalignments.
2. How do I reinforce weak miter joints?
Add splines, biscuits, or Dominos. Epoxy glue also fills gaps better than PVA.
3. Can I use pine for dovetails?
Yes, but hardwoods like poplar or cherry are more stable and splinter less.
4. What’s the best glue for wood joints?
Titebond III for water resistance; hide glue for reversibility.
5. How do I fix a gap in a mortise and tenon?
Shim with veneer or sawdust-glue mix, then sand smooth.
6. Are biscuits stronger than dowels?
No-dowels offer 20% more shear strength, but biscuits excel in alignment.
Check This Woodworking DIY Projects as a DIYer
I like this post, enjoyed this one regards for posting.
Thanks for Feedback
I love it when people come together and share opinions, great blog, keep it up.